Everyone has different tastes but the shaker door will always be on trend.
Entry, April 12, 2023
Kitchen cabinetry is no exception when it comes to what you like and what your design tastes are comfortable including the palette of texture and colour.
Cabinetry was not a priority for many historic homes, mostly what we know as furniture style in nature. Large dough boxes, buffet with a hutch were very common in the kitchen. Ice boxes and pantry shelving. You have to remember that wood stoves with attached water tanks were fired in the morning and top off with water right away so washing and cleaning was possible. Hooks on the wall beside the stove secure the cast iron pans with a shelf above to keep cast iron pots and lids handy. Bread pans were wiped out, oiled and stacked to be easily accessed for the routine of the upcoming days and months and years of bread making. Even those storage cabinets used principles for design.
Five panel doors will never go out of style. These doors styles change names from craftsman to shaker too many other names.
A traditional five panel shaker door starts with two stiles, two rails and one centre panel. They were historically made with every thing from softwoods like pine and poplar to hardwoods including cherry, oak and maple.
Historically the wood was what was most available in area that the cabinet maker could harvest their wood.
First cutting down the tree, milling it, air drying it and then taking into the wood stove heated shop and milling it into usable material. Modular units like boxes with drawers and doors were not the norm. Built on site cabinets became a modern item as history marched on.
Once the home had been plastered and it had cured the carpenter or cabinet maker would bring in their wooden tool tots and portable cast iron table saw and possibly a jointer to rip up the milled lumber into widths of varying dimensions. They would start by nailing butt jointed cleats to the walls where upper and lower shelving would be required. A skeleton of the kitchen would begin to appear.
The face frames would commonly be morticed to accept a tenon locking the face frames in place. Wide boards would be nailed down to the cleats inside the cabinets to create the shelving, sometimes glued together but most commonly left to acclimate and shrink in size. Remember… lumber was not kiln dried, it was stacked with stickers between each layer to air dry. Wood takes on average one year per inch of material thickness to reach a workable moisture level ranging around 6-8%. No moisture meters were available and this was reliant on the experience of the tradesman.
The panel door was measured and built, again tongue and groove, mortise and tenon, rabbet, pocket, dado, dovetail, and half-lap joints were all used and dependant on the client and the skill of the maker.
To add detail applied mouldings were common and raised panels have been around as long as cabinetry has been. Arching the inside of the top rail or tombstone top rails have been used on upper cabinetry for ever. Most commonly with a matching interior raised panel.
Trends today are clean lines… even flat doors with no detail. That would not fly in many pioneer home makers houses but became very popular when plywood became available. 1950’s natural exposed grains covered with layers of shellac or varnish… matching the trim in the house. Detail was not lost in this era it was rearranged. This continued into the sixty’s with the influence of designers like William Morris, Marcel Breuer, Frank Lloyd Wright to mention just a few…
As the seventies and eighties come alive, cabinet makers and home owners learned what European cabinets were. The material had change to particle board with a melamine surface and an oak bottom rail incorporating a groove to be used as a handle. Pre-built boxes with fillers and side panels gave the whole kitchen a modular but fixed to the wall finish.
All through the trends five panel doors never lost out. This design is solid in its design and does not date a kitchen. The colour… that can.
Nobody ever looked a a white five panel cabinet door and said: “ that’s from the fifties and out of date” because it’s not. No matter the colour, grey, cream of plain white and five panel door stands in a class by itself and will be here long after trends change.
Not all trees are shade or firewood.
Entry, Dec 4, 2019
Having a home is many things to many people. The curb appeal is a very strong part of why we may purchase a home in a mature neighbourhood. Bushes, scrubs and winding walkways are all part of the experience that is conveyed while enjoying the feel of a persons yard. Trees provide shade, they may have interesting branch configurations and the fall colours are an event worth waiting for.
The down fall is that a structure built within a natural setting or a setting that is replicated to feel natural is that trees and bushes can be detrimental to that structure. Nature has a way of gobbling up structures… they don’t care if you build in their space providing you don’t cut the life supporting roots. If you do cut them, they have a way of getting back at you by falling on your building and commonly causing damage. It is their way of flipping you the bird.
Think about it… the root system of a tree is typically as much as the overhead canopy. Don’t put trees any closer to your house than 15 feet if you don’t truly want the tree to cost you big bucks in the not so far off future.
Buying a home with a tree only feet from the homes foundation means two things. Moving the house or cutting down/moving the tree. You are not killing your best friend by cutting down a tree, your best friend, the house will love you for the rest of its life for the support.
Replace the tree with another tree in a better location, and so the tree space is not forgotten plant a bed of flowers or put in a water feature. Something can be said about being creative with the area but do remove the stump and ensure the tree has be totally removed.
Nature brings nature, so a rock garden with water feature will bring in birds, a bonus for removing the trees that they once sat in.
If you have removed a tree with some girth, look to see if you can find someone that mills those trees into lumber slabs so the tree can live on even further and bring some joy to the new caretakers.
Did you say SHIPLAP?
Entry, Dec 28, 2018
The request for shiplap is becoming more regular, attributed to HGTV personality Joanna Gaines I would expect.
Shiplap was a go-to sheathing board adopted by home builders until the late 50’s when plywood become a material of choice. The attraction to the wood look has always been there, you see it used when casting concrete using shiplap as a form material and left exposed to show off the incredible texture. The grain of the wood is what grabs you and brings a sense of comfort and warmth. Granted, it’s not for everyone taste.
Painting, white washing or even staining it allows for design to soften the impact or make it stand out.
My experience, wood has fibres, and fibres can be a place for dust bunnies to cling onto. Putting a sanded seal coat on after the finish really helps with the raised fibres. You have to remember though, every coat of finish adds to the overall cost, and sanding off fibres is not hugely labour intensive, but it does add up depending on the level of finish. An option is… and I personally hate working with it. MDF, it paints, stains and finishes like butter. The draw back is the air quality due to the dust being made while cutting, routing and sanding it.
You have to weigh the options, the availably and the cost.
Real wood always wins in my book, but it does come with a level of cost on larger projects.
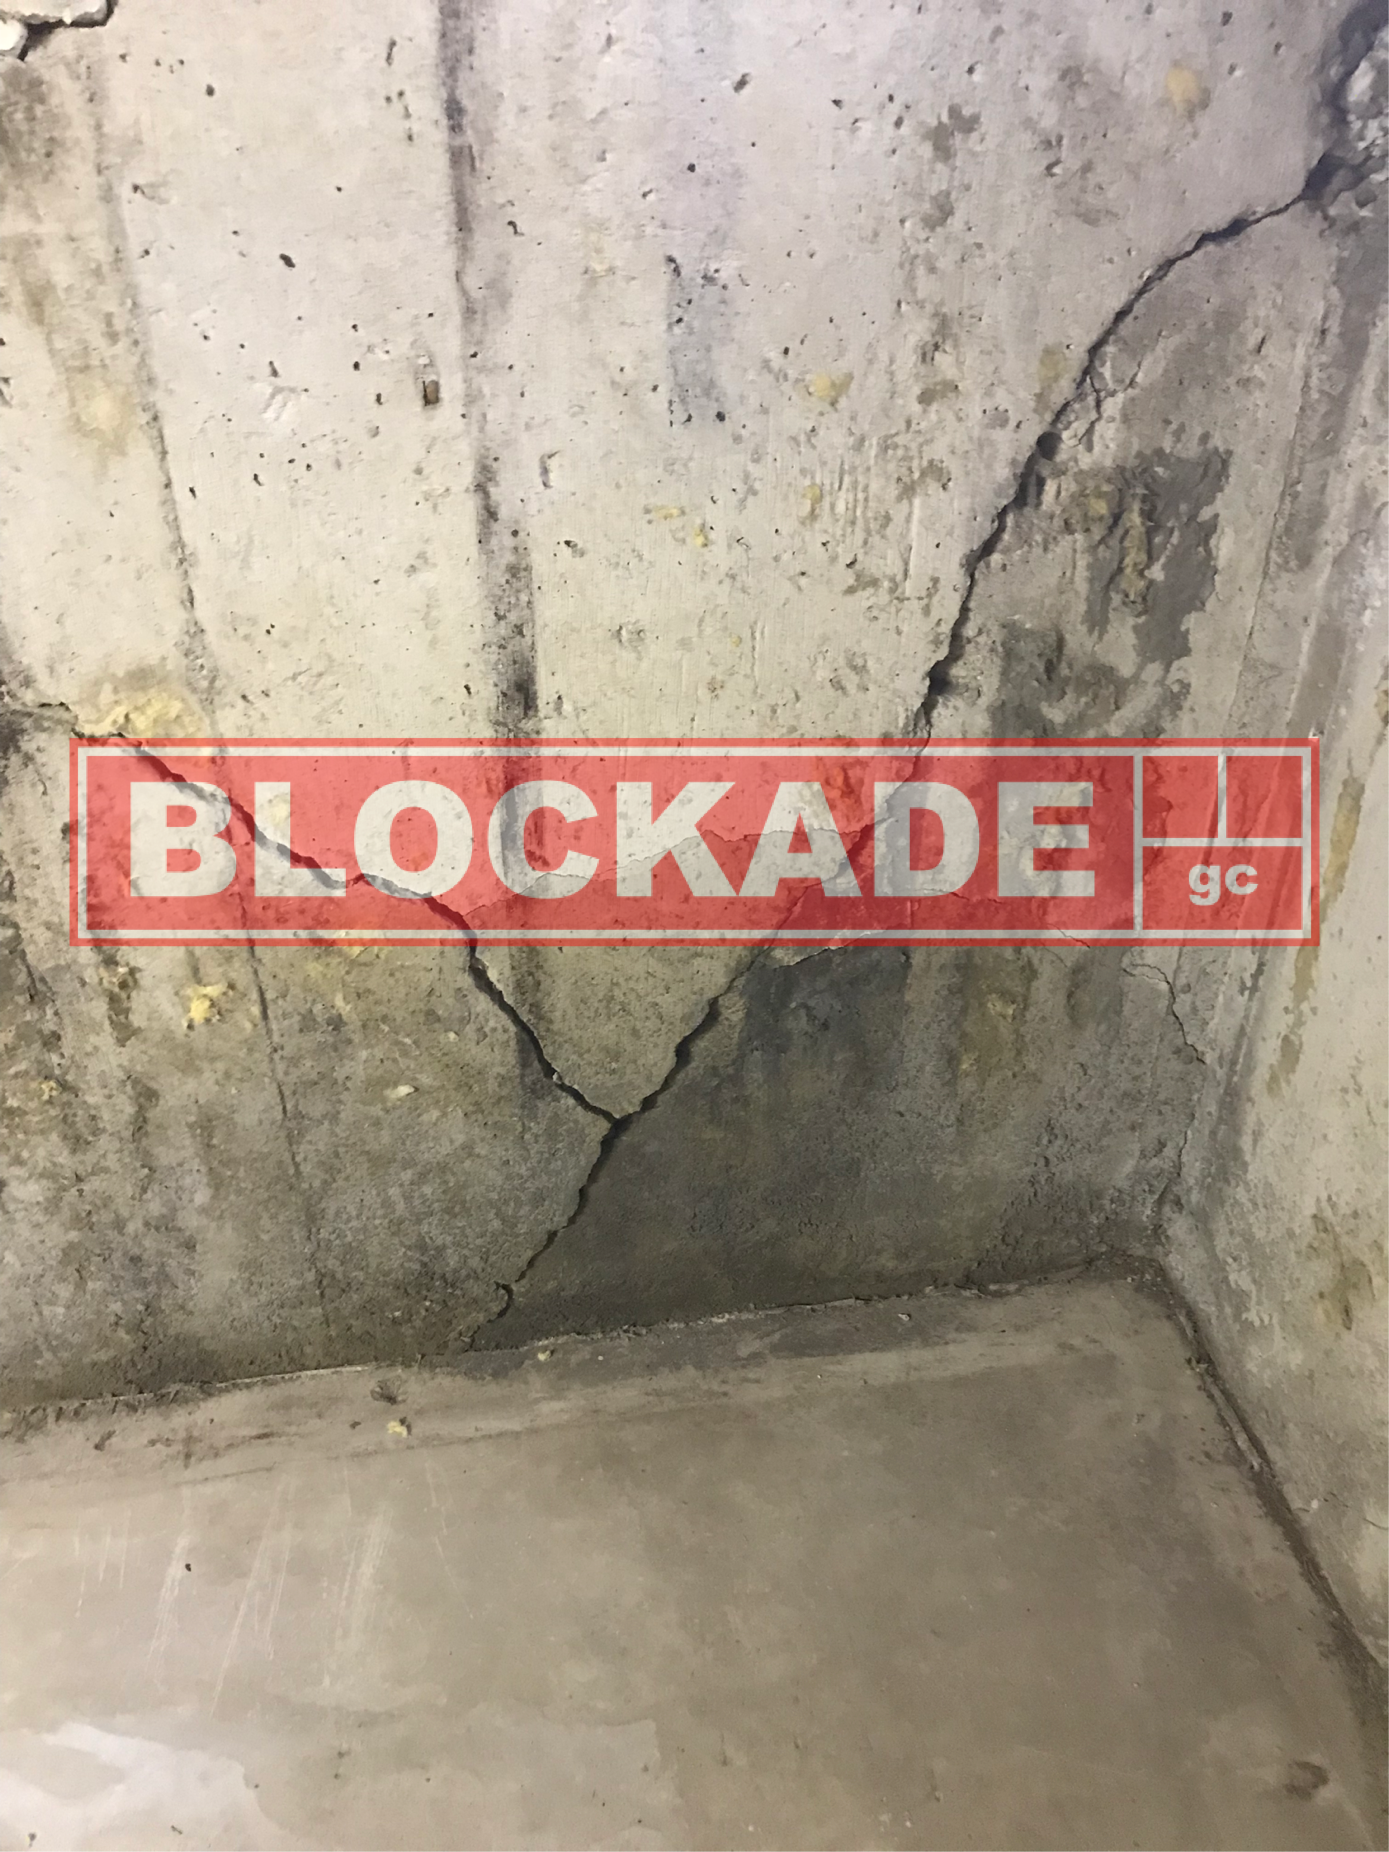
Why our foundation repair system works.
Entry, Dec 10, 2018
With tongue in cheek…We always recommend wearing a rain coat on the outside of your clothes…. Most foundation repairs... due to cost are done to resolve the constant intrusion of water when it rains or when snow melts. If you are not fortifying the footings or base material, you are depending on the fact that the cause of the crack has either stabilize on its own or that other solutions or factors have corrected the cause. Even in most circumstances there will be small amounts of movement based on soils and freeze thaw cycles. The advantage of repairing the foundation crack from the exterior is that causes for the cracking can be resolved at the same time. Bridging a crack, rather than relying on butt joint repair with either epoxy or polyurethane as a filler is far superior and further effective when backed up by a drain board. "Think of a bridged crack as a roof truss where the joints are butted together and relay on only glue to hold them, then see the gang nail plates that bridge the butt joint and actually hold the truss together. Bridging the foundation crack is similar to the gang nail on a truss.” A fibre reinforced bridge can be specified as glass or carbon fibre. In all cases of the bridging, a rubber sealant is used for waterproofing, then covered by a drain board. In the cases where window wells are flooding and cracks have formed. Proper drains can be installed at a minimal cost because the excavation is already being done. When cracks have formed in the wall with cracking along the rim joist line that is visible on the exterior, other solutions are included at the time of backfilling to remove the soil pressures that contributed to the cause of the failure.
Is it DIY?
Entry, June 2, 2018
(DIY) Foundation repair is not a do-it-yourself project for most people. If you believe you are qualified and up for the task... read on.
The first order of business is discovering the source of the water you have found on your basement floor. Is the water coming from a backed up floor drain, a leaking pipe or somewhere else? If the source of the water is not because the cat or dog was feeling indifferent to the litter box or would rather not take a walk outside, the chances are a crack has formed in the basement foundation wall.
Before breaking open walls and tearing up carpet, walk around the outside of your home. Look for a source or cause. If the evident water is near a basement window, look closely at the corners of the window. It is very common for concrete to crack in these locations. Depending on the cause of the crack, it could be running relatively vertical and could indicate some lateral force be placed on the length of the basement wall. If the crack is diagonal, a common cause is settlement. Looking closer at the crack in the window area, observe if a window well is located in front of the window and does it appear to be filled with drain rock and is it draining correctly. It is common for DIYers to install a window well, not knowing how to correctly drain it or not be aware that it needs to drain. Other cracks are common within 8-10 inches of the out side corner of an exterior foundation wall. Cracks are also found in locations where footing heights change, as seen with step footings for split level homes.
Now that you have discovered the source of the leak, a question to ask yourself is "how do you remove the source water" and "is it even possible to remove the source of water"? In the case of a window well, with no well drain. The solution for the cause is installing a window well drain when dealing with the effect, “repairing the crack”.
Exterior foundation crack repair commonly deals with the cause and the effect. Excavated soil management needs to be your first thought. Don’t underestimate the amount of soil coming out of the hole you will be digging. Where are you going to pile the soil? Consider the fact that the soil from an eight foot deep hole spreads out to about twice the size of the hole due to bulking. Even if the soil piled around the hole is only four feet in height, that makes the hole you dug 12 feet deep... Very dangerous. It is best to move the soil away from the hole or off site completely if required.
Bridging a crack in the foundation wall is paramount when repairing and waterproofing it. An "isolation barrier" such as dimpled membrane is a good product to use for this, the membrane keeps frozen soil from pulling at the repair in the future and it provides a backup layer allowing future rain water to drain down to the weeping tile.
If your plan includes injecting urethane or epoxy into cracks and voids, it is recommended to do this before excavating. These products have advanced greatly, and provide an ideal backer for placing finishing coats over to renew the look of exposed foundations. It should be noted that the hit or miss of blindly pumping expanding foams into cracks can result in plugging weeping tile or missing sections due to the fact you can not see where the product is going. WE have witnessed this as a "fact" when excavating the exterior to complete a repair.
As a side story, we were called to a house that had been experiencing water leaking through a crack and along the perimeter base of the same wall.
The customer had either hired someone or bought a kit from BIG BOX STORE and drilled for the ports along the crack and along the length of the wall base. They injected the ports and over the course of several days, chasing water coming in with more holes and ports at the perimeter.
We were called by the customer for solution. What the customer had not known was by drilling holes so closely together, we believed a fail point may have been created at the base of the concrete wall. Similar to a dotted hole on paper that says “TEAR HERE” It was not know by us or by the customer whether the holes were drilled completely through the wall. WE agreed to excavate an area of the home before committing to a solution.
What we did find was, ice or snow must have been in the original form work prior to pouring the concrete and left a void several meters long. The void was large enough to place a hammer handle under portions of the wall. The injected foam had filled some of the voids which required removal to repair due to the product not having the compressive strength required to hold up the wall. Secondly some of the foam had migrated to the weeping tile and had plugged it completely. Long story short “YOU DON’T KNOW WHAT YOU DON’T KNOW”
Concrete has been used to construct buildings before modern time and many structures still stand today. Those structures have seen cracking and have all been repaired, to some degree. A tomb on the ancient Appian Way in Rome, the Pantheon and Roman Colosseum are just a notable few. There are parts of aqueducts and drainage systems though-out the world, used to this day.
Portland cement, aggregates and silica sands are a large part of concrete, "asbestos" being added to concrete is more modern and was developed in the early 1900’s. The asbestos fibres were used for typical fibre tensile strength benefits, although some testing indicated that they didn’t actually add much improvement. These fibres are fire resistant and may provide much benefit in this respect. It should be noted that "asbestos" fibres have been added to plasters and mortars too.
Knowing what your foundation is made from and how to protect yourself from not only contaminating your home, but repairing a failing foundation correctly is understanding what products you are dealing with and having certified professionals guide you or do the work for you.
Know that anyone in Alberta can do work on their own home and anyone living in Alberta can apply for and get a business license, buy business cards and have a website designed. Anyone in Alberta can put signage on their truck and put on coveralls. YouTube educated and being able to read product instructions does not certify any of those who chose to not take the time to receive accredited training or recieve testing in the trade. Truly, its a no brainer when it comes to who should be working in your home. Ask to see certifications.
We at Blockade truly believe education is key, we are Red Seal Certified Tradesmen and Alberta Asbestos Abatement Certified. "Ask to see our certificates"...
Know the risks, if anyone including the contractor is exposed to asbestos while working in your home, their/your risk of ASBESTOSIS and MESOTHELIOMA increases. As anyone who has been trained to correctly provide asbestos abatement knows "containment and encapsulation" is key.
With-out getting into procedures, a certified and qualified proffesional will know when testing concrete, drywall and mortar should be done prior to doing any work inside the home. It is their health too.
Today has brought injections as a fast and simple ways to fill a foundation crack. We understand doing this type of repair has its time and place but not with-out risks. Testing by Alberta Certified professionals will give you the assurance if work is being done inside your home, you are not contaminating your home instead of fixing it. Understanding that "drilling and grinding" concrete puts dust into the air. If the dust contains hazardous material, it can and will migrate to your living space and be breathed by all occupants of the home until it is totally "filtered" out or "breathed" in.
For those who are selling a $500.00-$2000.00 interior repairs, would be asked by an educated client if that includes containment and HEPA filtered air... has the drywall, concrete or mortar been tested? Are they Alberta Red Seal Certified? If the (THIRD PARTY) testing comes back with asbestos in it, are they Alberta abatement certified and qualified and what is the "COST". It should be noted that all Alberta certified professionals carry with them their certificates and can present them when requested. Don't missunderstand, most homes from the 70's till today have very limited or no asbestos, but do contain material with silica.
Education can be scary but should not be considered a fear tactic, all the information is readily available in MSDSs documents and can be researched. Some examples of workers with high potential risk for crystalline silica exposure are those involved in: stone cutting, foundry work, sand blasting, concrete mixing and grinding, rock drilling, tunnelling and jack hammering.
Open air (Outside) repairs are not with-out risk either. Not being inside the home and exposing the occupants proves there is an exceptionally less chance of causing concerns to indoor air quality because you are "not inside grinding/drilling" before filling a crack with injected urethane or other products.
It is your castle, deal with professionals that are qaulified and certified and trust the Red Seal for all tradespersons.
WE work on most homes from the outside-in and from the foundation up for many reasons.
Information on why a foundation fails
Entry, Dec 7, 2017
Vaporization
Moisture is being removed from the top layer of the soil near the foundation by hot or cold conditions; this in itself does not put a huge amount of stress on the homes basement but does require repair if it cracks. In addition the concrete is stressed when coupled with plants and trees putting down deeper roots to obtain precious moisture from deep in the ground causing the soils to pull away from the concrete walls. Foundation settlement will occur showing cracks that will need repair throughout the its structure. Cracks will be seen in concrete and other interior finishes.
Poor soil
Basement walls will fail and will require repair when constructing on disturbed soil or on multiple soil types. As the foundation settles or the differing conditions of soil react, the concrete again is stressed and if the foundation is not designed to handle those stresses, it fails, ending in a needed repair.
Poor construction
No reinforcement steel in the concrete could contribute to the premature failure of the basement. Poor concrete mixes. Under and over consolidation of the concrete mixes or poured in extreme cold conditions without the use of procedures or admixtures.
Freeze thaw cycle
When water freezes it increases in volume by approximately 9%, if the soil around the foundation is holding any amount of moisture it becomes a frozen mass and can put pressure up to 207MPa, this is enough to fracture the wall, footing or floor. When the soil thaws the moisture can then enter the fracture and can collect, when it becomes cold enough to freeze again the water becomes ice, it expands forcing the crack to fracture more, making it larger. This allows the opening to take on more moisture. The cycle can happen several times a season. A hair line crack will become large enough to allow significant water in over time. Basement leaks leads to non-structural foundation issues such as mold, mildew, insect and other pest...
Plumbing and sewer line
Poorly back filled excavations or over excavated lines, Water from leaky plumbing and sewer lines can be a major contributor to foundation problems.
Poor drainage
Water that does not drain away from structures foundation will lead to excessive moisture build up. Water will erode soils and cause settling of structures.
Adfreeze
Occurs when frost-susceptible soil freezes to the foundation wall, then lifts up on the wall or footing, as the soil heaves.
How to correct grading.
Entry, Sep 2, 2016

If your home is older than ten years, you are likely beginning to see how the grade has settled around your home and along buried water and sewer trenches. Your first instinct is add more top soil. Top soil is not the material that you should be using to build up grade that has settled around your home or to fill in low spots so that ground water will flow away. Sub-grade material in the Edmonton area is typically clay, it is what your home or buildings footing sit on, it is what surrounds your home or buildings foundation. By using a similar material to the undisturbed soil that the structure is built on as a grade material you do two things.
1. You maintain how the soil reacts in freeze thaw conditions
2. You create a common moisture retention in the sub-grading soil
By using top soil as a grade material, the moisture or ground water that soaks in, will follow the sunken sub-grade clay grade material back to the structure rather than flow away. It becomes an underground river that uses the sunken clay grade material as a pipeline back to the structure. To correct grade conditions the top soil needs to be pulled back to expose the rough grade, grade material needs to be added and compacted then the topsoil can be returned. A recommended slope for the grade material is ten to fifteen percent, this slope should continue out from the structure for a minimum of five to six feet. The City of Edmonton recommends 4-6 inches in 5-6 feet. You do not want to direct the water to your neighbours yard, drainage swales on the property line need to be part of your design. For lot grading information, you can contact your local authority. Even more importanly, you do not want to bring the grade on the house so high that it is higher than the concrete. It is best, when possible to keep wood no closer than 8 inches to grade. Understanding that many older home have had grade changes including street elevation changes. This can make it difficult to maintain the 4-6 inch rule of thumb.
Edmonton, Alberta

This is our beautiful City...